Building a custom customer portal with the Recharge API
The customer portal allows customers to manage their subscriptions, update billing information, and see their purchase history. Recharge has two built-in customer portal themes and a Theme Editor that allows merchants to customize the customer portal's user interface using HTML, CSS, and JavaScript.
Custom stores can build their own custom customer portal using the Recharge API. This option allows merchants with custom stores to host their own customer portal and fully customize the experience. This guide provides an overview and instructions for building a custom customer portal with the Recharge API.
Custom customer portal architecture
A custom customer portal is compromised of the backend architecture and the frontend architecture. The backend architecture is responsible for sending API calls and receiving responses and the frontend architecture is the user interface that the customer interacts with.
Backend architecture
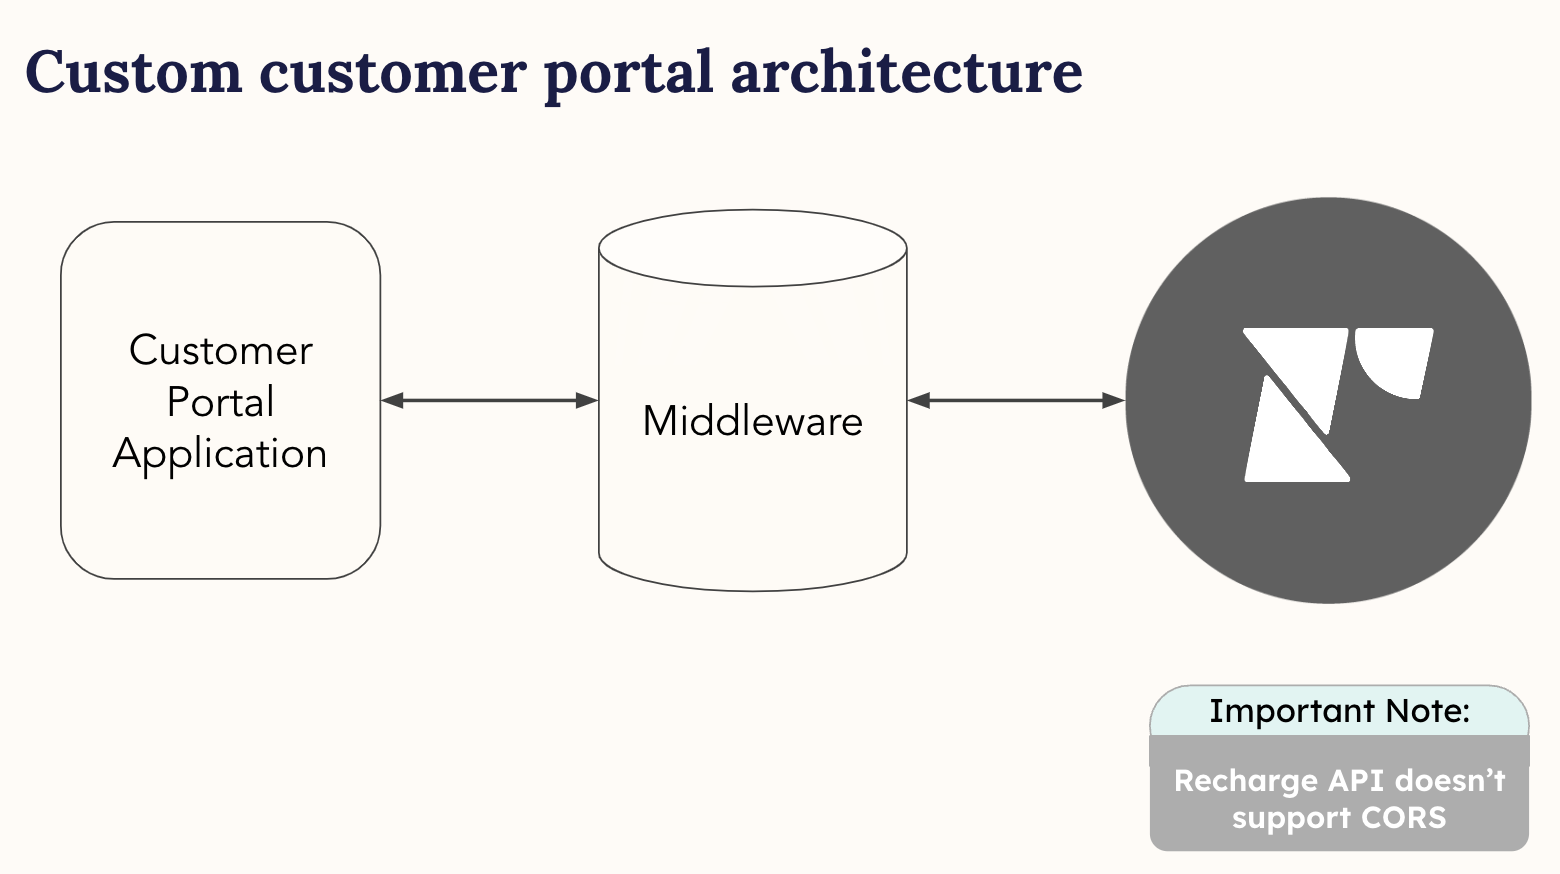
The backend architecture of a custom customer portal is compromised of the following:
- Customer Portal Application
- Middleware
- The Recharge API

In this example, the Customer Portal Application reaches out to middleware that is hosted on a merchant's domain. The middleware handles the API calls to the Recharge API and passes along the appropriate API responses to the domain's frontend. Middleware is necessary for creating a custom customer portal because the Recharge API does not support CORS, so connecting to the API from another domain is not possible. Middleware also provides secure storage of Recharge API keys on the backend.
A benefit of this architecture is the ability to have a single API call result in multiple responses. For example, when a customer adds a one-time product to a shipment, a single API call can add the one-time product to the customer's subscription and also update metafields on a customer object to track that customer's order history for a loyalty program.
Frontend architecture
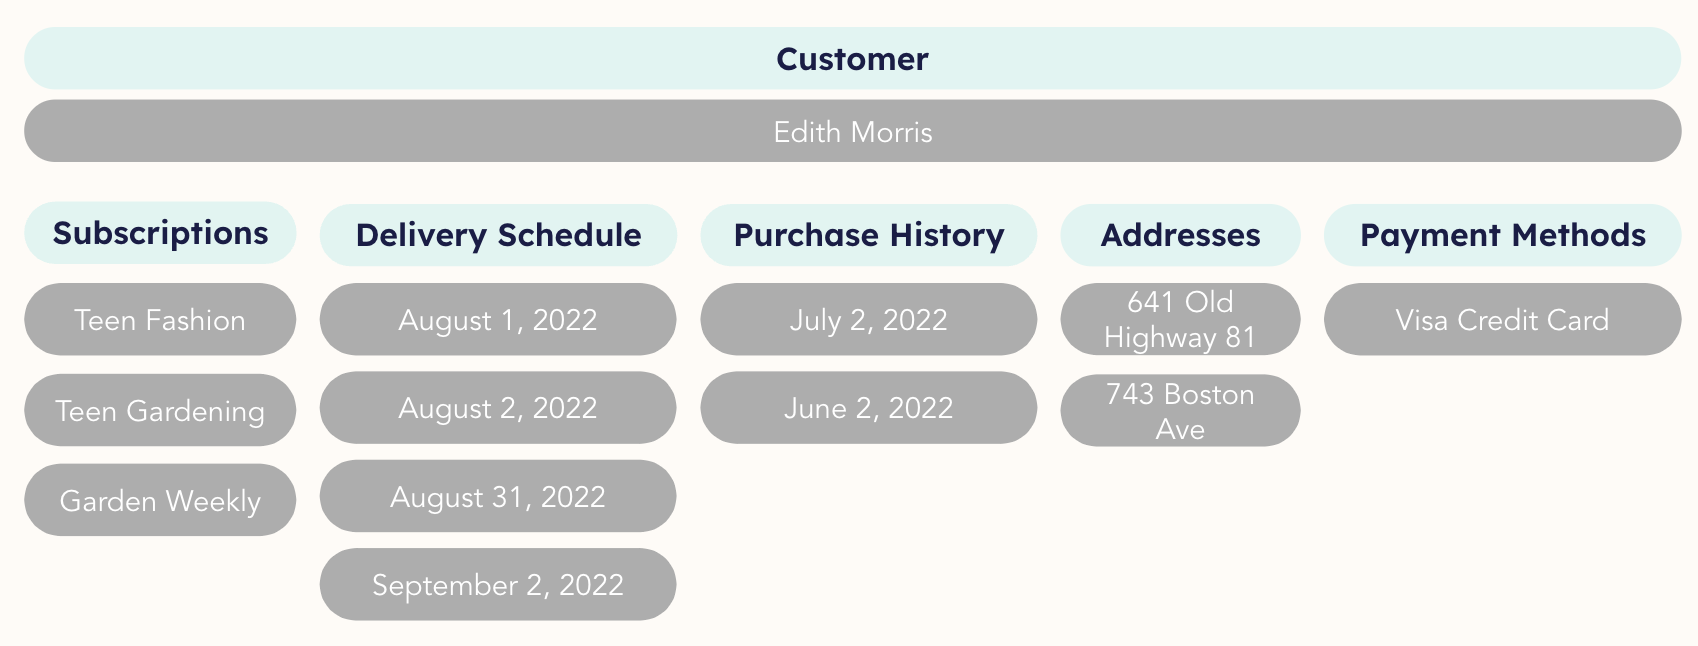
The frontend architecture receives API responses and acts as the user interface that customers use when managing their subscriptions. The general frontend architecture of a custom customer portal is compromised of the following:
- Customer
- Subscriptions
- Delivery Schedule
- Purchase History
- Addresses
- Payment Methods

While you are not required to structure a custom customer portal using the same frontend architecture, this example provides a general overview of how a custom customer portal can be configured.
Under each component of the frontend architecture, you will want to decide what actions a customer can perform. For example, under the Subscriptions component you may want to offer the following actions to your customers:
- Change the charge date
- Change the frequency
- Skip order
- Swap product
- Cancel subscription
- Add one-time product
Each component and the corresponding actions for that component are created using calls to the Recharge API.
Retrieving the customer hash
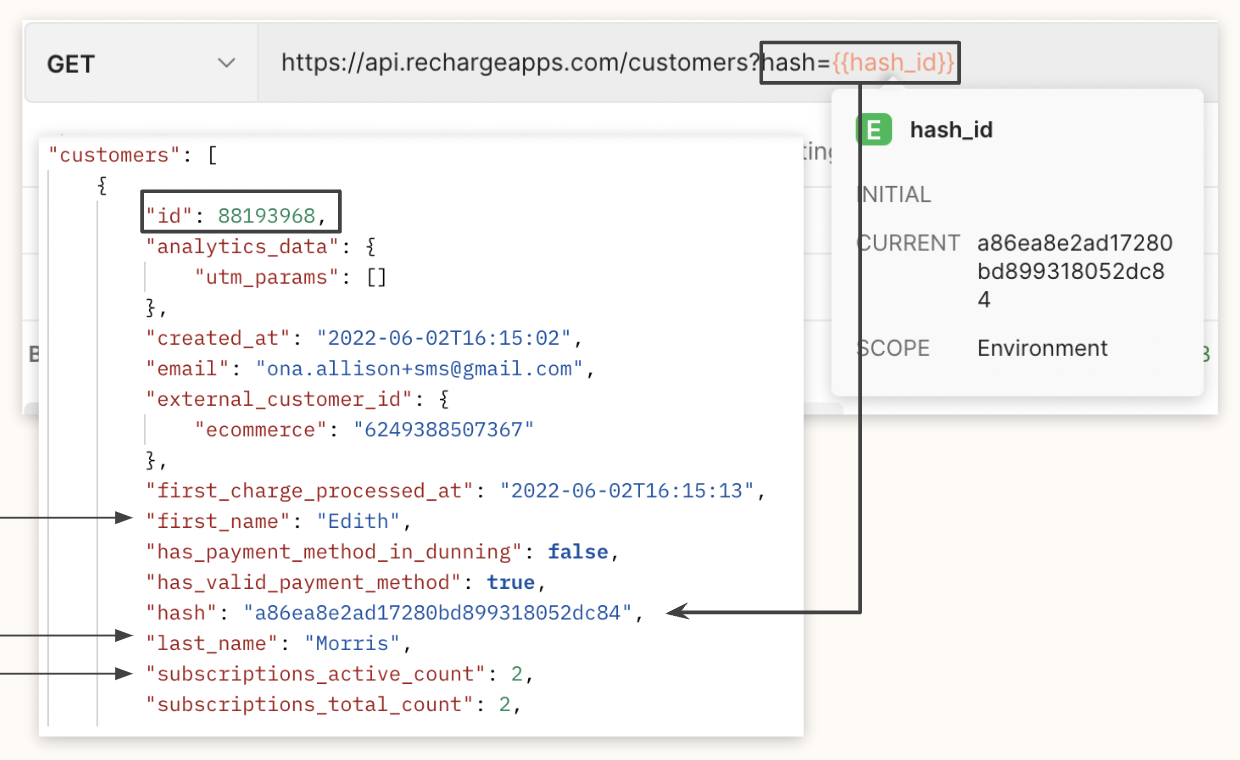
In a Recharge-hosted customer portal, a customer_hash is used when a customer accesses their customer portal. The customer_hash authenticates the user and maps the user to the correct customer_id. The customer_id is then used to locate the correct customer details.
For custom customer portals, the customer_hash or customer's email address can be used during login to map the user to the correct customer_id. After the customer_id is retrieved, you are ready to build the different features and their corresponding actions for your custom customer portal.

Use the following directions to retrieve a list of your customers' customer hashes:
- From the merchant portal, click Data and select Exports.
- Click Create export.
- From the Export type menu, select Customers and add your email address to the export.
- After the export is finished downloading, open the Export and view the file.
- Retrieve the
customer_hashfrom thehashcolumn.
Creating actions in the customer portal
Creating a custom customer portal allows you to have full control over how your customers manage their subscriptions.
There are several different features of the customer portal that you can build. Each feature has specific corresponding actions a customer can take in the customer portal. In the following tables, each feature and its corresponding action shows the API requests needed to build the customer portal.
Note
The following request actions use API version 2021-11.
View Subscriptions
View Subscriptions features typically live under the Subscriptions section of the customer portal. The recommended actions for this feature allow a customer to view their subscriptions and add a subscription directly from the customer portal.
| Action | Request | API Reference link |
|---|---|---|
| View current subscriptions and subscription details | GET /subscriptions?customer_id=<customer_id> | List subscriptions |
| View single subscription and subscription details | GET /subscriptions/<subscription_id> | Retrieve a subscription |
| Add a subscription | POST /subscriptions | Create a subscription |
Edit Subscriptions
Edit Subscriptions features typically live under the Subscriptions section of the customer portal. The recommended actions for this feature allow a customer to edit and manage their subscriptions, add a onetime item, or cancel their subscription.
| Action | Request | API Reference Link |
|---|---|---|
| Change charge date/next shipment of product | POST /subscriptions/<subscription_id>/set_next_charge_date | Change a subscription charge date |
| Order now/Process charge | POST /charges/<charge_id>/process | Process a charge |
| Skip shipment/Skip charge | POST /charges/<charge_id>/skip | Skip a charge |
| Unskip a shipment/Unskip charge | POST /charges/<charge_id>/unskip | Unskip a charge |
| Add discount code to a single charge | POST /charges/<charge_id>/appy_discount | Apply a discount |
| Add discount code to an Address ID/Add discount code to all subscriptions under a customer's Address ID | PUT /addresses/<address_id> | Update an address |
| Update subscription | PUT /subscriptions/<subscription_id> | Update a subscription |
| Swap out subscription product | PUT /subscriptions/<subscription_id> | Update a subscription |
| Add one time product to next shipment | POST /onetimesNotes: Use the add_to_next_charge boolean if there is a known queued charge to add to so it ships out with the next subscription shipment.If there is no queued charge, set the date for the onetime to be processed with next_charge_scheduled_at. | Create a onetime |
| Change delivery schedule | PUT /subscriptions/<subscription_id>Notes: This request updates the subscription and changes the order_interval_frequency and order_interval_unit.The charge_interval_frequency must also be updated to align the new schedule. | Update a subscription |
| Cancel subscription | POST /subscriptions/<subscription_id>/cancel | Cancel a subscription |
Delivery Schedule
Delivery Schedule features typically live under the Subscriptions or Delivery Schedule sections of the customer portal. The recommended actions for this feature allow a customer to see upcoming charges and skip or unskip a shipment.
| Action | Request | API Reference link |
|---|---|---|
| See upcoming shipments/charges | GET /customers/<customer_id>/delivery_schedule | Retrieve a customer delivery schedule |
| Skip charge/shipment | POST /charges/<charge_id>/skip | Skip a charge |
| Unskip charge/shipment | POST /charges/<charge_id>/unskip | Unskip a charge |
Purchase History
Purchase History features typically live under the Subscriptions or Purchase History sections of the customer portal. The recommended actions for this feature allow a customer to see past charges, charge statuses, and order details.
| Action | Request | API Reference link |
|---|---|---|
| See past charges | GET /charges?customer_id=<customer_id> | List charges |
| Show charge status (error, success, pending, etc.) | GET /charges?customer_id=<customer_id>&status=queued, refunded, partially_refunded, success, error | List charges |
| View order details | GET /orders/<order_id> | Retrieve an order |
Shipping Addresses and Payment Methods
Shipping Address and Payment Method features typically live under separate sections of the customer portal, but these features rely on one other to store data. Payment Methods are stored under Shipping Addresses (Address IDs). The recommended actions for these features allow a customer to manage their shipping addresses and payment methods.
| Action | Request | API Reference link |
|---|---|---|
| Shipping Addresses | GET /payment_methods?customer_id=<customer_id>Notes: Each Address ID for a customer has its own Payment Method and each Payment Method has its own Billing Address. | List payment methods |
| The customer object has an email attribute for this data. | The customer object | |
| Data for card(s) on file | GET /payment_methods?customer_id=<customer_id> | List payment methods |
| View all addresses | GET /addresses?customer_id=<customer_id> | List addresses |
| Update Shipping address | POST /subscriptions/<subscription_id>/change_addressNotes: If there are multiple subscriptions that need updated, the request must be made multiple times. | Change a subscription address |
| Update Billing Address | PUT /payment_methods/<payment_method_id>Notes: Each Payment Method has its own Billing Address data that can be updated. | Update a payment method |
| Add additional addresses | POST /addressesNotes: Any additional Addresses need a Payment Method attached to it for charges to process under that Payment Method. | Create an address |
| Add new payment method | POST /payment_methodsNotes: Card data will need to be tokenized separately from Recharge API. New Payment Method will need to be set to a specific Address ID for charges under that Address to be processed. | Create a payment method Update an address |
| Update card for payment | POST /payment_methodsNotes: Card data will need to be tokenized separately from Recharge API. Update Address ID with the ID of the new payment method under payment_method_id on the Address object. | Create a payment method Update an address |
Create a demo customer portal using the Recharge API
You can use Postman to create a demo customer portal using a test Recharge Environment and pre-configured test Collections. To create a demo customer portal, use the Customer customer portal tutorials.
Updated 5 months ago
